Admin interface
Open /admin and sign in. Everything you need while the event runs is on this page.
Layout
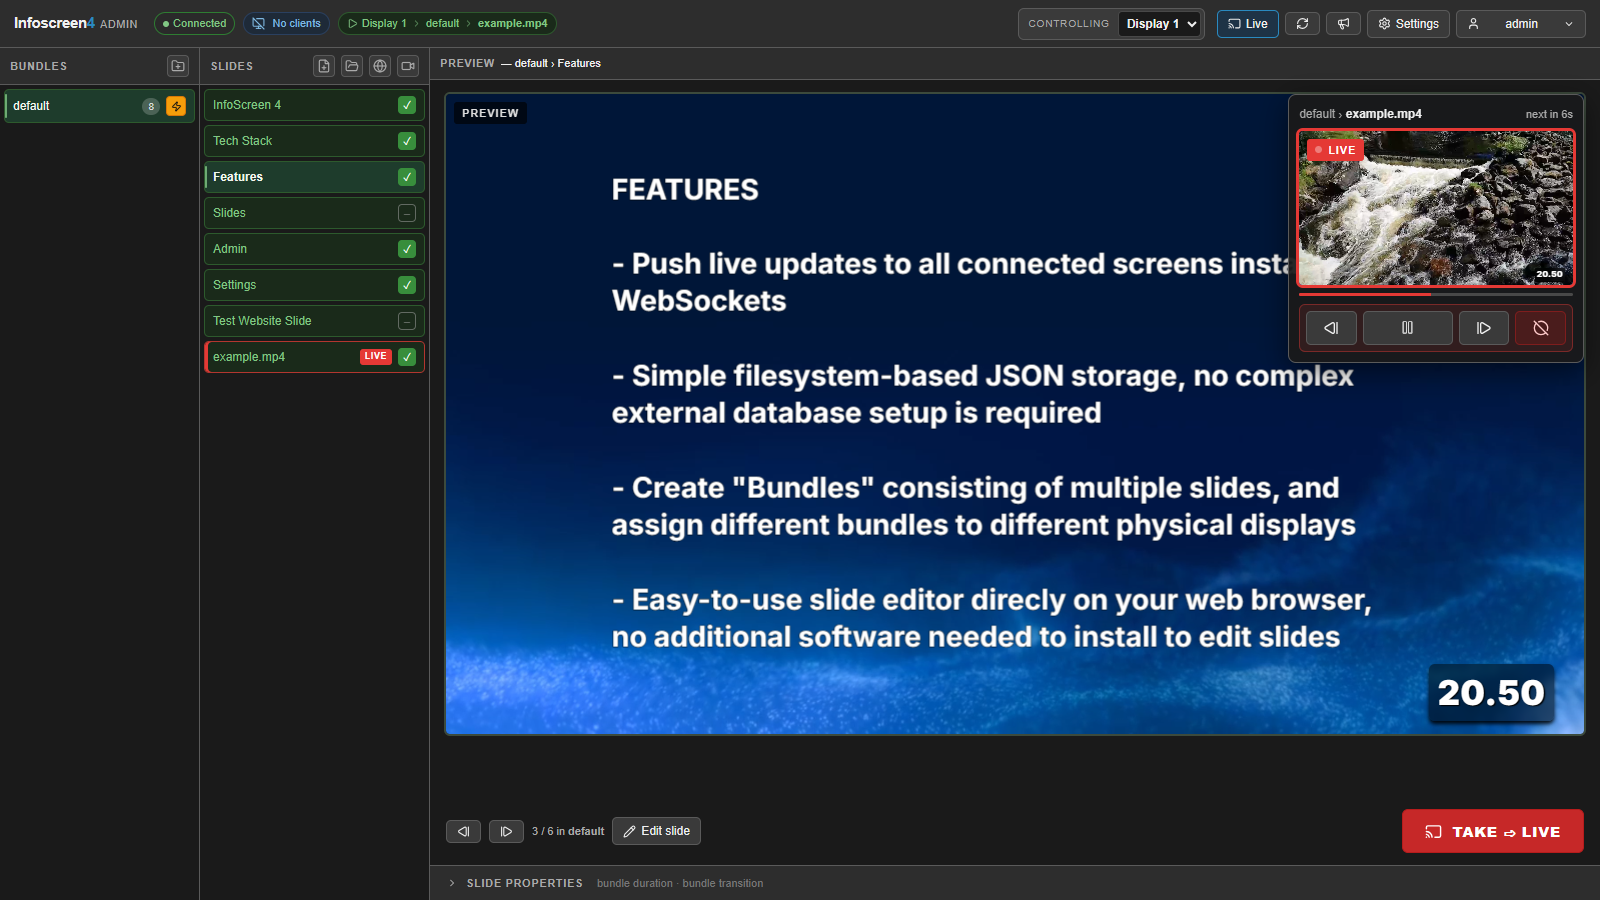
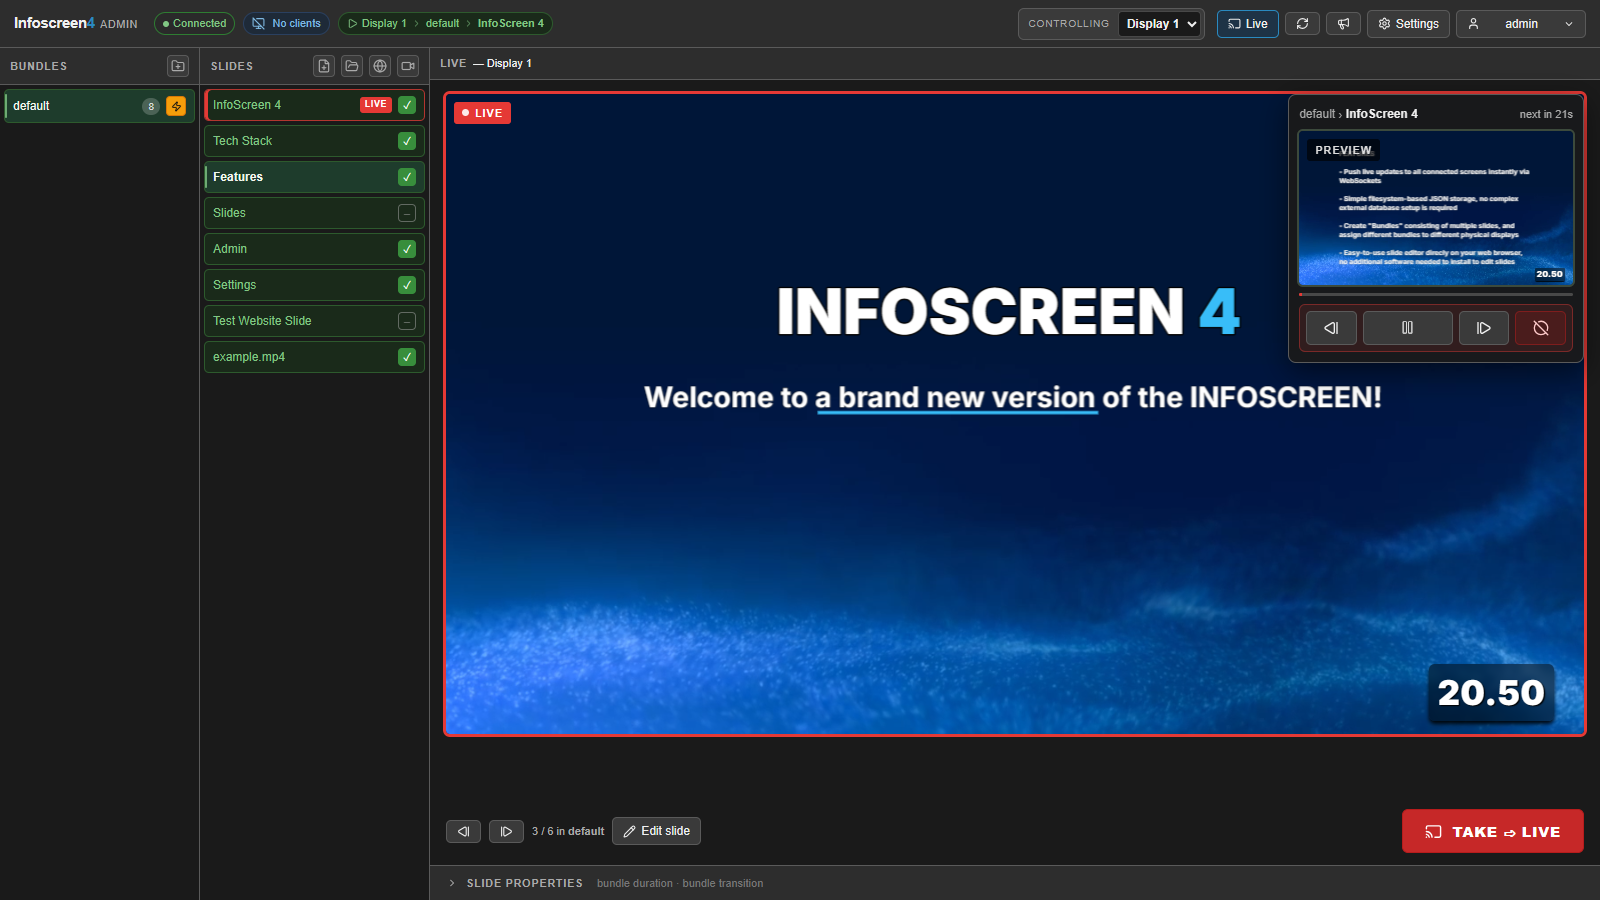
- Header: connection status, number of connected clients, and the display you control with the bundle and slide it is showing now. On the right are the Controlling display selector, the Live toggle, Reload bundles, the announcement button, Settings and Logout (hover it to see who is signed in).
- Bundles: list of bundles. The badge shows the number of slides. The ⚡ button makes the bundle active on the selected display. Right-click a bundle to rename, duplicate or delete it.
- Slides: the slides of the selected bundle, in playback order. Drag to reorder. The slide on screen now has a red edge and a LIVE tag.
- Preview: the selected slide, filling the main area. Under it are the preview navigation, Edit slide and the Send to LIVE button.
- Live view: a small window in the top-right corner showing what the selected display shows right now, with its playback controls.
- Slide properties: a collapsible bar at the bottom with the per-slide overrides.
Bundle settings, display configuration and users are in the Settings panel, and live streams in the Streams panel. Both slide in from the right and close with ✕ or Esc.
Changes made by one admin appear immediately for all other admins who have /admin open.
Bundles
Create a bundle
Click the New bundle button at the top of the bundle list and enter a name.
Make a bundle live
Choose the display in the Controlling selector, then click the ⚡ button on the bundle. The display starts playing the bundle from its first slide.
You can also start a bundle at a specific slide with Send to LIVE.
Bundle settings
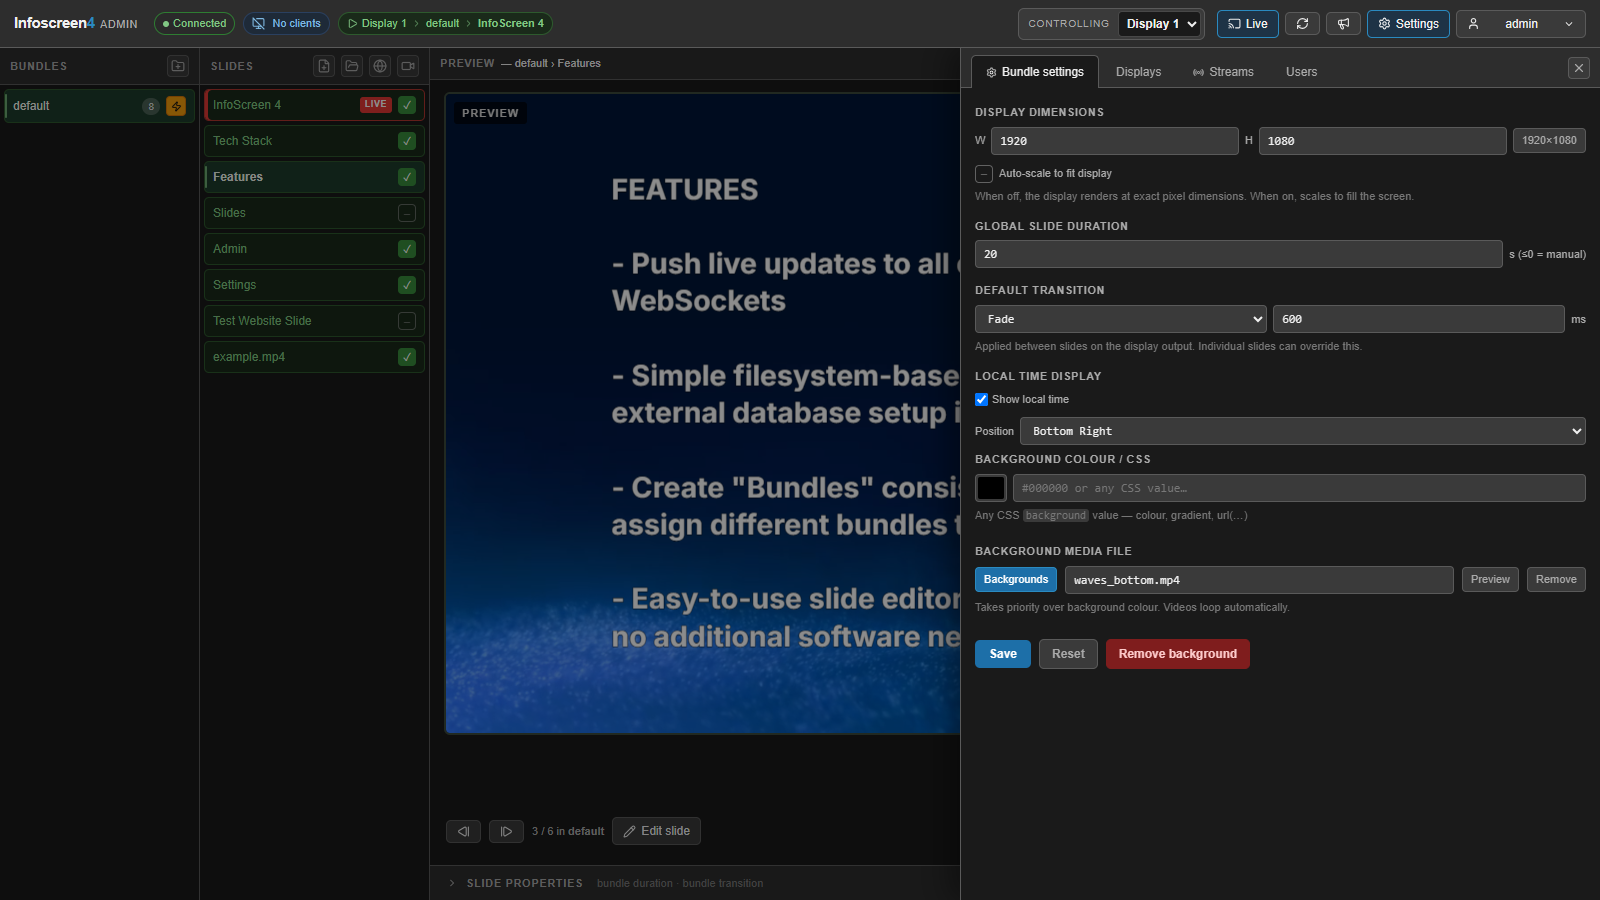
Click Settings in the header and open the Bundle settings tab to configure the selected bundle.
| Setting | Description |
|---|---|
| Display dimensions | Design canvas size in pixels (default 1920 × 1080). |
| Auto-scale to fit display | Off: the display renders at exact pixel size. On: the canvas scales to fill the screen. |
| Global slide duration | Default seconds per slide. 0 or less means manual: slides only change when you use the playback controls. |
| Default transition | Transition used between slides (see Transitions). |
| Local time display | Show a clock overlay in one of the four corners. |
| Background colour / CSS | A color, or any CSS background value (for example a gradient). |
| Background media file | An image or looping video shown behind every slide. It takes priority over the background colour. |
Click Save to apply. Reset discards unsaved changes.
Slides
Add slides
The buttons at the top of the slide list add:
- Create new slide: an empty editor slide, opened in the slide editor.
- Assign existing global slide: an editor slide from the shared library.
- Add website slide: a URL shown full-screen in an iframe. If you leave out
https://, it is added for you. - Add video slide: a full-screen video from the video library.
- Add image slide: a single image from the image library. It is fitted inside the bundle’s screen size and follows the bundle’s auto-scale setting.
Many websites block embedding with X-Frame-Options or Content-Security-Policy headers. Such a site stays blank on the display. The admin preview warns you only when nothing loads within 4 seconds, so check a new website slide in the preview before taking it live.
To change an editor slide, select it and click Edit slide under the preview.
Enable and disable slides
The checkbox on each slide adds it to or removes it from the cycle. Disabled slides stay in the bundle but are skipped during playback.
Slide context menu
Right-click a slide for more actions:
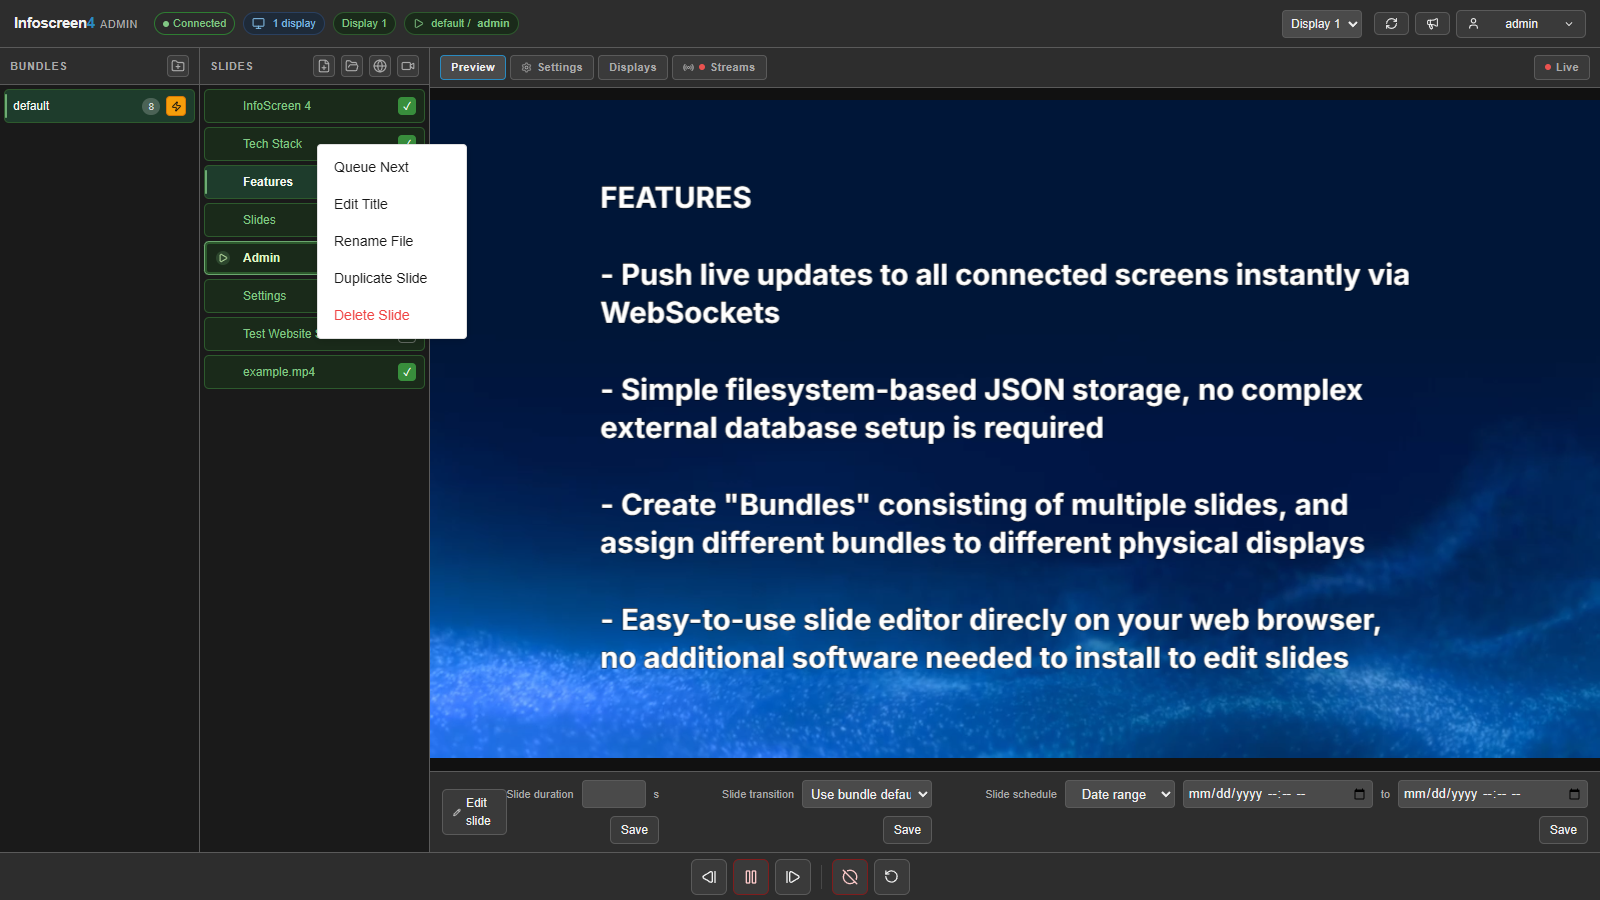
- Queue Next: play this slide right after the current one, then continue in normal order. Cancel Queued Next undoes it.
- Edit Title: change the name shown in the list. For website slides, this edits the URL.
- Rename File: rename the slide’s JSON file (editor slides).
- Replace Video: pick a different video (video slides).
- Replace Image: pick a different image (image slides).
- Duplicate Slide / Delete Slide
Per-slide overrides
Click Slide properties at the bottom of the page to override the bundle defaults for the selected slide. The panel opens on top of the preview, and the collapsed bar shows a summary of the current values. Click Save next to each setting.
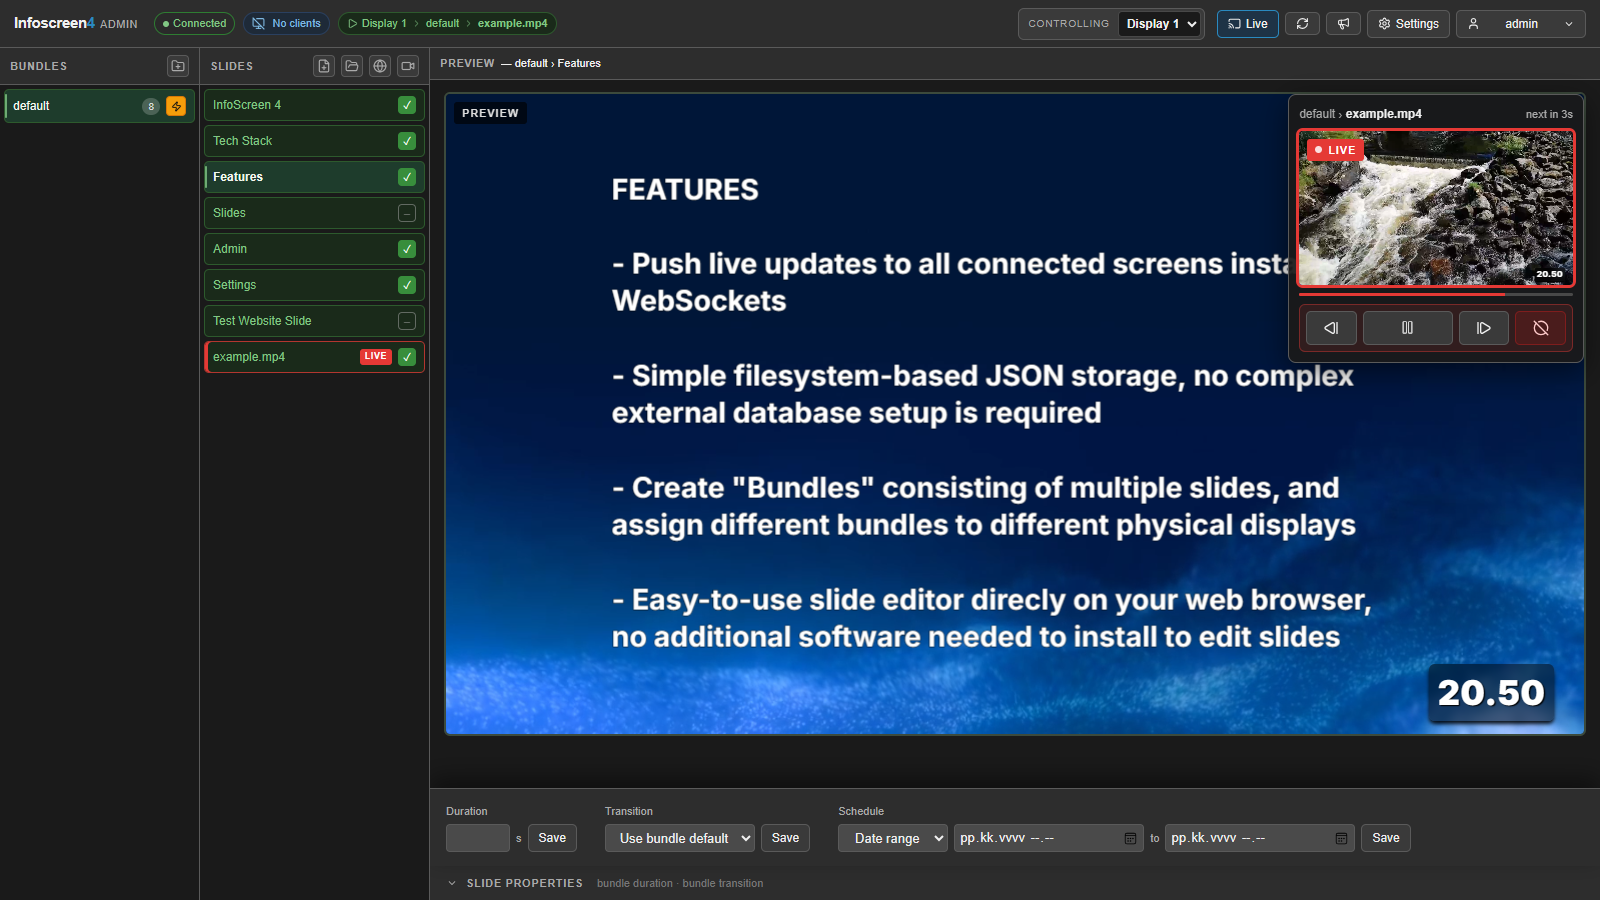
- Slide duration: seconds for this slide. Leave it blank to use the bundle default.
- Slide transition: leave it on Use bundle default, or pick a different transition.
- Slide schedule: see below.
Scheduling
A scheduled slide only plays during its window. At other times the display skips it.
| Mode | Behavior |
|---|---|
| Date range | A one-off window with an optional start and an optional end. Example: show “Tournament starts soon” from Friday 18:00 to Friday 20:00. |
| Daily time | Repeats every day between two times (24-hour, server local time). If the end is earlier than the start, the window runs past midnight, for example 22:00–06:00. The same start and end time means all day. |
Slides with a schedule have a clock icon in the slide list.
Transitions
Available transitions: None (instant cut), Fade, Slide left / right / up / down and Zoom. Each has a duration in milliseconds (default 600 ms).
A per-slide transition overrides the bundle default, which overrides the built-in default (none, 600 ms).
Playback control
The admin separates what you are looking at from what is on screen:
- Preview (grey frame) is only for you. Selecting a slide in the list, or stepping with the ◀ ▶ buttons under the preview, never changes the display.
- Live (red frame) is what the display in the Controlling selector shows right now.
Send a slide to live
Select a slide, then click Send to LIVE. The display shows the slide and keeps cycling the bundle from there. The button is greyed out when the previewed slide is already live.
If the slide belongs to a different bundle than the one the display is cycling, the admin asks you to confirm the switch first. The new bundle then becomes the display’s active bundle.
Send to LIVE works only with a mouse click. It has no keyboard shortcut, and pressing Enter or Space on the button does nothing, so a stray key press can’t change what is on screen.
Live view
The live view in the top-right corner shows the slide on air, a countdown to the next slide, and these controls:
| Button | Action |
|---|---|
| Previous slide / Next slide | Step the display through the bundle. |
| Pause cycle / Resume cycle | Stay on the current slide, or continue cycling from it. After a blackout, Resume cycle brings back the last slide. |
| Blackout | Clear the display until you show a slide again. Asks for confirmation. |
The countdown appears from the first slide change after you open the page.
- Click Live in the header, or press
L, to hide or show the live view. Your choice is remembered in the browser. - Click the live view to swap it with the preview, so the live picture fills the main area. Click the small window again to swap back.
Playback runs on the server, so displays keep cycling when no admin is connected, and a display that reconnects resumes the current slide.
Announcements
The announcement button in the header opens the lower-third dialog.
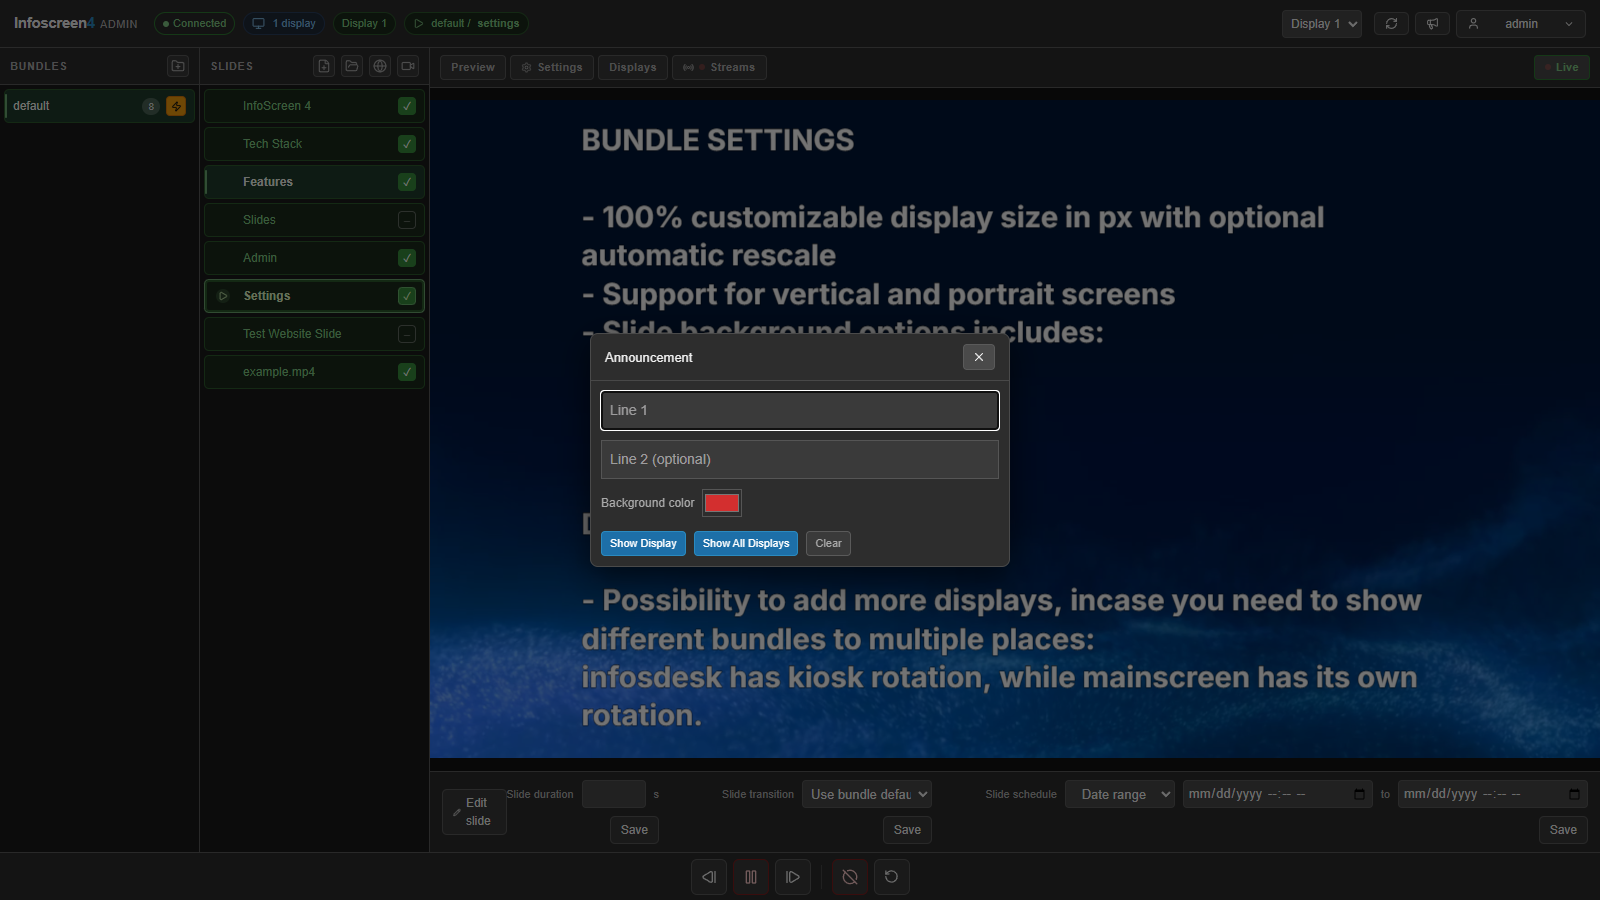
Enter up to two lines of text and choose a background color, then click:
- Show Display: show it on the selected display.
- Show All Displays: show it on every display.
- Clear: remove the announcement from all displays.
The announcement stays on top of the slides until you clear it. While an announcement is active, the button is highlighted.
Live streams
The Streams button in the header opens a panel listing everyone currently broadcasting from /send. The button shows a blinking red dot while anyone is broadcasting. Click Show on display to show a stream full-screen on the selected display, and Clear to return to the slides.